Showing posts with label Recipe - Other. Show all posts

Wednesday, July 26, 2017

Whipped Cream From Scratch

WHIPPED CREAM
1 c. whipping cream
3 1/2 T. powdered sugar*
1 t. vanilla**

Put all ingredients into a quart sized glass bowl.
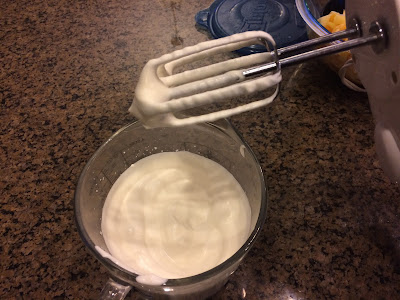
Using a hand mixer, beat until soft peaks form
 (When you lift the mixer out of the cream mixture, the peak will remain, not fall). 
Chill or enjoy right away.

*You can use 2 T. granulated sugar in place of 3 1/2 T. powdered sugar
 **The type of vanilla greatly affects the flavor of your whipped cream. 
I like to use imitation vanilla 


Try it on pancakes, oatmeal, fruit, or pie!

Did you know you can also make whipping cream with a can of Evaporated Milk?

What is your favorite type of vanilla?

Wednesday, September 21, 2016

Aunt Geneen's Jello Salad

Creamy, fluffy, sweet and delicious!  This is one of my favorite desserts and it's super simple and quick!


Aunt Geneen's Jello Salad
1 large (6 oz) package Jell-O 
1 cup boiling water
2/3 c. canned milk
9 ice cubes
2 c. fruit, drained

      Heat water until boiling. (I like to heat it in the microwave.) Stir Jell-O into boiling water until dissolved.  Put milk and Jell-O mixture into blender.  Turn blender on and carefully add ice cubes.  When blended well, pour into bowl and let sit for 1 minute Gently spoon on the fruit.  It will slowly sink into the Jello. This will set up in the fridge in about 10 minutes!

Some flavors to try...
*The Original* Orange Jello with 1 large (20 oz) can of crushed pineapple, drained  (I like tidbits)
Orange Jello with Mandarin Oranges, drained
Raspberry Jello with fresh or thawed raspberries
Lime Jello with 1 large can pineapple tidbits, drained
Sometimes I like to leave the fruit off and just enjoy the fluffiness of the dessert!

Small Batch
1 small (3 oz) package Jell-O 
1/2 cup boiling water
1/3 c. canned milk
5 ice cubes
1 c. fruit

Thursday, March 19, 2015

5 minute Lentil Curry Dip

5 Minute Lentil Curry Dip
19 oz can of beans or lentils, rinsed and drained
½ c. ranch 
2 t. cumin Or  1 t. curry 
2 cloves garlic  Or   ¼ t. garlic powder

Puree in blender and serve with chips or pretzels!


I like to make a smaller batch if it's just for our family!
1/4 batch :)
5 oz = 6 T + 3/4 t. Pureed beans or lentils)
2 T. ranch dressing
1/8 t. cumin or 1/4 t. curry
1/2 garlic clove or 1/8 t. garlic powder

Tuesday, May 21, 2013

Kristin's Crockpot Pinto Beans

I learned to make these delicious pinto beans from my 'unofficial' sister, Kristin!!!  Thanks girl!


This little crockpot makes 1/2 a batch!


2 c. dry pinto beans
6 c. water
  Soak 6-8 hours, drain, rinse, and refill with water to cover beans by 1 inch.
Add the following ingredients to the beans and water in the crockpot and cook about 3 hours on high or 6 on low (depending on the crock pot and texture preference)

1 Arbol chili
1/2 onion (or 4 t. dry minced onions)
1 garlic clove, whole (or1/4 t. dry minced garlic)
2 1/2 t. salt

When finished cooking, drain off all liquid and toss out the chili. You can discard the onion and garlic if you want also and then go enjoy the beans!
Mine have stayed fresh in the fridge in a container with a lid for at least a week!
I like to divide them up into individual serving sizes and freeze them for a quick meal.


DON'T FORGET
1/2 c. cooked beans = 1 serving of vegetables or 2 oz. of meat
 Oh.... you can count dry beans, peas, and other legumes as a serving of vegetables or a serving of meat, but the same bowl of beans can’t count as a serving from both food groups. :)

 Click Here to see how much of each food group you need each day/week!

Monday, October 15, 2012

David's Salmon Steak Marinade

Marinade for 2 fish steaks...
3 T. soy sauce
2 T. lemon juice
2 t. olive oil
1 T. tomato sauce or ketchup
1/4 t. prepared mustard
1/2 T. spring onion and top, minced
1/4 t. minced ginger

2 Salmon steaks (about 1" thick)

In shallow, container (or plastic bag) combine all the marinade ingredients. Add salmon and turn to coat each side. Cover and refrigerate 30-60 minutes. Remove salmon and pour the remaining marinade into a sauce pan.  Bring to a boil over high heat and boil for 10 seconds.
Grill the steaks over direct-high heat until cooked to desired doneness, 6-8 minutes for medium-rare, turning once (make sure you leave the Salmon grilling long enough on the first side so that it releases from the grate and is easy to turn). Serve warm.

Wednesday, August 15, 2012

Microwave Popcorn - homemade


Place 1/4 c. of unpopped Popcorn Kernels (and a dab of butter and seasonings, if desired) in a 1.5 qt. microwave safe bowl and cover with a microwave safe lid or microwave safe plate.
Put in microwave on high until done popping.  (1-2 pops per second, or just watch if it is in a clear bowl)   My microwave took 3 minutes, 15 seconds.


 I did about 1/2 tsp. butter and couldn't even taste it.   Guess I'll have to make caramel corn :)

Here's a few tips that I found...   

    "For those of you having problems burning the popcorn in the microwave before all the kernels are popped…  I invert a saucer (like you’d set a coffee cup on) in the microwave and put the bowl on top of it. I don’t know why this works but it does. It seems only certain microwave ovens burn prematurely – I’ve only ever had one that burned the kernels before they were all done and the inverted saucer fixed the problem."


"One reason kernels don’t pop is because they don’t contain enough water to produce the steam required to get them to pop.If you soak your kernels in a bowl of water for a few minutes then dry them off on a towel before you begin popping, you’ll get a much better pop corn to kernel ratio."


.....

Saturday, March 24, 2012

Home-made Ice Cream

I LOVE home-made ice cream but my Soldier thinks they always have a weird after taste...

The other day we were talking to my brother,  Barney,  about his favorite new icecream recipe and my Soldier wrote down exactly how to make it..    He didn't realize that it was pretty much like every other recipe I had tried and he didn't really like so I figured it'd be the perfect time to experiement :)  yep, another kitchen experiment :)

This morning I mixed it up exactly as Barney said.   Then I mixed up a batch using my neighbor, Anna's recipe. Last summer, my Soldier commented that it didn't have that 'wierd after taste' and I'd got the recipe from her!

The recipes are quite similar in ingredients.. the main difference:  Barney's is cooked, Anna's isn't.
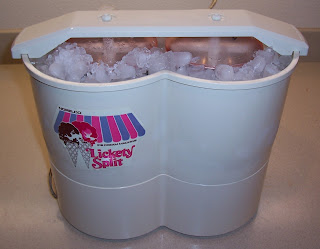
I let both set in the fridge for 8 hours then put them into my Ice cream maker.   My maker has 2 (1-quart) containers so I actually made half a batch of each recipe so they'd be a perfect comparrison!

Here's the before picture!
Barney's - left,   Anna's - right

I start the machine, layer ice, rock salt, ice, salt.. etc. Then let it do it's magic.

Barney's was done after 25 minutes.

Anna's was done after 35 minutes!


We put each of them in a plastic container in the freezer for just over an hour.


The results....
Barney's was just a little more creamy with a ... 'french vanilla' ice cream flavor.
Anna's was creamy, a little icy and a mild flavor.

My soldier and I both picked... Anna's flavor
note...Barney's ice cream flavor got better after a few days in the freezer!

Here's both the recipes.

Barney's Ice Cream
(makes 2 quarts)
2 eggs
1 c. sugar
1/4 t. salt
2 1/2 c. Whipping Cream
2 c.  Half and Half
2 1/2 t. Vanilla

Whip eggs until fluffy. Slowly add sugar while you continue to beat it.  Add the salt, cream, & Half and Half.  Cook in a double boiler over medium heat (or in a sauce pan, stirring  constatantly) until it is 160 degrees.  Cool the mixture quickly and add the vanilla (I poured it into the glass bowl that I'd beat it in and put the bowl in a sink of cold water so the water came 1/2 way up the bowl).   When cool, cover and refrigerate 8-24 hours.   Or, if you're impatient, put it in the ice-cream maker and follow the directions of your maker.     It'll be more creamy if you let it sit overnight!


Anna's Ice Cream
(makes 2 quarts)
2 eggs
1 c. + 6 T. sugar
1 T. corn starch
1 c. Whipping Cream
2 c. Half and Half
3/4 c. milk (or enough milk to reach the 'fill' line)
1 t. vanilla

Beat the eggs until fluffy, Slowly add the sugar while you continue to beat it. Add all the other ingredients and stir well, until the sugar is dissolved.  Cover and refrigerate 8-24 hours. Or, if you're impatient, put it in the ice-cream maker and follow the directions of your maker. It'll be more creamy if you let it sit overnight!


What is your favorite ice-cream recipe or thing to add to your home-made ice cream?  


Got a Dairy-free, Egg free, Gluten free, Corn free, Soy Free  Ice Cream recipe that you've actually tried and like?


....

Tuesday, January 10, 2012

No yeast Pizza pockets

Yep, I've been at it again! Since I've been reading about gluten-free cooking, plus no yeast, corn, soy, dairy, etc... that my friend can't eat, I've come across an emergency substitution of substituting baking soda and cream of tartar for yeast.  It had mixed reviews.  Here's mine!

I make pizza on Monday nights and tonight I planned to make pizza pockets. Since my honey's still working late and I've been patient for 2 hours and didn't want to wait for the yeast to raise the pizza dough, I thought that I'd try the tip. 

OK, so the only thing I changed in the recipe was substitute 1-1/4 t. baking soda and 1 t. cream of tartar for 1-1/4 t. of yeast.
There's definitely a flavor change.  It reminded me of baking powder biscuits at first.  The bread is still fluffy, tender, and it cooked great!  See the pictures... it looks normal, just tastes different.  I put spaghetti sauce, ham, mozzarella cheese, and fresh pineapple inside.. drool :)  Yep it was delicious. I even have another for lunch tomorrow... although it does look really good and I am still a little hungry....   No, I'll wait and eat it tomorrow. Plus I gotta cook another batch right now cause my Soldier's on his way home :)!!!!

OK, so I made the regular yeast dough recipe for my Soldier and after I made the regual dough... I was able to compare the two :)... it felt the same right after mixing it all up. When I flattened it out to shape it for the pizza pocket, I really noticed a difference. The baking soda version was very airy and squishy and easy to shape.  The yeast ones were flat and I needed to be more careful so I didn't make a hole in it. I had to sprinkle flour on the counter for both of them.  It was easier to shape the soda one.  I only had to wait 10-15 minutes for the yeast bread to be ready to bake.   I prefer the yeast one but in a pinch, I'd do the soda one again.... just mentally prepare for it to taste like baking powder biscuits!


I don't know how I'd like it in regular bread because it'd lose that yeasty flavor.  Of course I'll have to try a little loaf :)  I guess if you want bread in a jiffy and don't want to wait for it to raise...    
   I'll let ya know what new bread recipes I come up with if they're any good. Then I'll link the new recipes ... HERE... !

Friday, January 6, 2012

Fluffy sugar cookies and frosting

I love fluffy sugar cookies that aren't too sweet... just perfectly delicious!


Here's how I do it! The trick to really fluffy cookies is... pureed beans. Yep, pretty crazy 'eh?  Well here's my recipe in case you're still curious!  You can make them without beans too if it's just too wild.

SUGAR COOKIES
Serves 40 (2.5") ,  20 min-prep dough,  40 min-shape and cook 
1 c. sugar
¼  t. salt
1 c. shortening or butter  (I use 3/4 c. of pureed beans and 1/4 c. shortening or butter). 
1 t. baking soda
2 eggs
½ c. evaporated milk or cream
1 t. vanilla
3½ c. flour
1 t. cream of tartar


      Cream together sugar and shortening. Then add rest of ingredients. Mix with an electric mixer.  Roll  out dough ½” thick on a floured surface and cut out shapes with cookie cutters or roll into balls. 
Bake at 350ยบ for 10-12 minutes on a greased cookie sheet.


CREAMY COOKIE FROSTING
Serves 1 ¼ c., 5-10 min-prep
Beat until fluffy-

¼ c. margarine or butter

½ t. vanilla

1 egg white
Food coloring- optional
Beat in 2-3 c. powder sugar alternately with  2 T. evaporated milk added 1/2 T. at a time! 


Roll out 1/2-inch thick and cut shapes

Let cool on a rack before frosting.


Monday, October 31, 2011

Cooking with Pureed Beans

You might think that using beans in a recipe will make it taste weird but.....
   Some recipes (snickerdoodles for example) become more soft and fluffy!
Try it out!  If you think your family won't like it, just wait and tell them after they've tried it.  Think they still won't eat it? Offer them cookies for breakfast, who can turn that down... even if it has beans? :)


Did you know that you can replace the oil in some recipes with pureed beans?
(Thanks to my sister for this awesome bit of advice)

The general rule of thumb:  ‘up to half’ of the oil called for in a recipe can be substituted.
If your recipe calls for ½ c. butter, you can use ¼ c. butter and ¼ c. pureed beans.
This also applies to margarine, shortening, lard, vegetable or olive oil!
If you're unsure, start with substituting 25% then 50%. Each recipe will be different. Have fun experimenting!

WHAT KIND OF BEANS? 
I prefer to use white beans as they have minimal flavor and color. If you’re making brownies or something with chocolate, go ahead and use black or pinto beans as the color won’t matter!  
 (I’ve never experimented with other kinds of beans so please share your findings!)


Why do I use pureed beans?
-I prefer pureed beans because it doesn’t add flavor but does add protein, and fiber and reduces the amount of oil I consume!
-I prefer pureed beans instead of applesauce because I don’t need to worry about it adding extra sweetness to the recipe like applesauce does.
-You’ll notice that you don’t have a greasy aftertaste in your mouth like you normally get from high oil-content foods such as frosting.

What recipes can I use pureed beans in?
-In most baking recipes!
-In cookies, they will become more fluffy which makes a delicious Snickerdoodle (I actually use 75% beans and 25%  butter in Snickerdoodles and get asked for the recipe all the time… boy are they surprised when I tell them my secret ingredient)
-In a pie crust, it will be a little crisper and if you use too much, it can become crunchy (I’d suggest only 25-50% beans).
-In frosting, it will be a softer texture. Expect to use it for the ‘flat’ frosting.  The more beans, the flatter it will be.  Go ahead and experiment using 25%, then 50% and see which you prefer.

When will I NOT use beans again?
My mom and I were making hard caramels and I figured I’d give it a whirl with using ½ beans and ½ butter instead of all butter.
The results were?           …. Drum roll please….  
Flavor- The same as the regular recipe.     Appearance- Just a hair darker.       Texture- Grainy.
Conclusion: The kids were ecstatic that we let them eat up the caramels and they didn’t mind at all!

Ok, are you ready to try it out?

IN A NUT SHELL
1 c. + 1 T. dry beans = 3 c. + 3 T. cooked beans
1 c. + 1 T. cooked beans + 2 T. bean broth = 5.3 oz (10 T + 2 t.) pureed beans
3 c. + 3 T. cooked beans + 6 T. broth = 16 oz (2 c.) pureed beans


HOW TO PREPARE PUREED BEANS
1 - The jar shows dried beans.  Cook beans as suggested below or use rinsed, canned beans. 
2 - Mash (with a fork) or blend (in a blender) 1 cup of  cooked, drained beans until smooth, adding 2 Tablespoons of bean broth/liquid until it’s the consistency of soft butter, shortening, or lard.
3 - Place  1 cup (8 oz) of pureed beans into the square plastic container (shown bottom,left) and smooth it out.
4 - Use a butter knife to score (lightly cut ½-¾ way through) it into 16 pieces like the diagram (shown bottom,right).
5 - Now freeze the beans so you can break it into 16 pieces (1 tablespoon each) as needed. This makes it easier to thaw and use. Keep pureed beans frozen and sealed in a freezer bag/container.


THE BASICS ABOUT SOAKING AND COOKING BEANS
Dried Bean Guide
Use this guide to gauge how much dried beans to cook.   (1 serving – 1/3 cup. cooked beans)
¼ cup dry beans
¾ cup cooked beans
1/3 cup dry beans
1 cup cooked beans
½ cup dry beans
1 ½ cups cooked beans
2/3 cup dry beans
2 cup cooked beans
1 cup dry beans (1/2 pound)
3 cups cooked beans, drained
2 cups (1 pound) dry beans
6 cups cooked beans, drained
One 15-ounce can of cooked beans
1 ½ cups cooked beans, drained

PRESOAKING DRIED BEANS: Rinse beans in water and pick out any broken pieces and rocks. Add water/beans in sauce pan. (1 part dried beans to 3-4 parts water)

The Quick Presoak method is to boil the beans for two minutes, take the pan off the heat, cover and allow to stand for one hour. Before cooking the beans, regardless of method, drain the soaking liquid and rinse the beans with clean water.

TO COOK BEANS: Add three cups of fresh water or broth for each cup of dried beans. The liquid should be about one to two inches above the top of the beans. Bring the beans to a boil and then reduce to a simmer, partially covering the pot. If any foam develops, you can skim it off during the simmering process. Black beans generally take about one and one-half hours to become tender using this method.    (Soaked beans cook in a saucepan in 1-1 ½ hours  OR in a 15lb pressure cooker  in 5-8 minutes.)

DO NOT add any seasonings that are salty or acidic until after the beans have been cooked since adding them earlier will make the beans tough and greatly increase the cooking time.
Right click on the above document to print or download the recipe

You can also use Pureed Lentils
Best of luck!


.....